![[Photo of the Front Side of our rse-2c micro-controller card]](images/side1-1card.smaller.jpeg)
 Welcome to our pages on upgrading your Auto-Register Programs. Here,
we will tell you where to find the Programs, and how to physically
replace them. It's easy, because it actually boils down to just
replacing the Controller at the Print Station.
Welcome to our pages on upgrading your Auto-Register Programs. Here,
we will tell you where to find the Programs, and how to physically
replace them. It's easy, because it actually boils down to just
replacing the Controller at the Print Station.
To see why you might want to, check out Auto-Register Versions to see the improvements to the Registration Controller Program over the years. There you will be able to check out the latest Versions of the Program, compare them to yours, and maybe decide to Upgrade your controller.
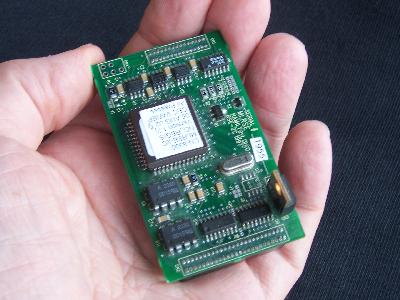 This is a picture of me holding one of our rse-2c controllers. You'll
find one of these (or one of our newer rse-2d controllers shown below)
at each Print Station; they are the “brains” behind the Auto-Register
system. As you can see, the whole controller fits into the palm of
your hand, and is about two thirds the size of a Credit Card.
This is a picture of me holding one of our rse-2c controllers. You'll
find one of these (or one of our newer rse-2d controllers shown below)
at each Print Station; they are the “brains” behind the Auto-Register
system. As you can see, the whole controller fits into the palm of
your hand, and is about two thirds the size of a Credit Card.
Like all things modern, the actual “brain” or rse-2c or rse-2d
controllers is a microprocessor. That's the big chip you see in the
middle of the board. But unlike the microprocessor chips you're
familiar with in PC's and such, these microprocessors are almost
self-contained. These microprocessor chips don't need RAM and ROM
memory chips, disc drives, communications chips, and so on, because
they've got their own.
 We put a program into the microprocessor chip's memory here at the
factory. Without a program, the controller is, of course, as useless
than a lump of coal &mdash more, because at least you can burn the
coal. Mostly, it's the program that we improve over time to give you
better registration.
We put a program into the microprocessor chip's memory here at the
factory. Without a program, the controller is, of course, as useless
than a lump of coal &mdash more, because at least you can burn the
coal. Mostly, it's the program that we improve over time to give you
better registration.
Within certain limits it's possible for us to upgrade your system by
re-programming your Registration Controllers. If you've got a rse-2d
controller (introduced early 2008), you're golden. They're a cinch to
reprogram. If you've got a rse-2c controller (produced 1997 to 2007),
we can generally upgrade to version 1.7j, but you'll have to weigh the
advisability of sinking new money in old stuff that can't be upgraded
further than that version. If you've got a rse-2b controller (produced
1993 to 1997), then we can take it in trade, but it's not upgradable
to any reasonable Register version.
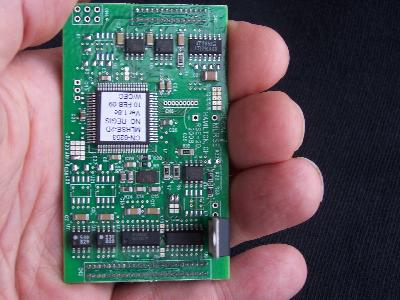
 This is a picture of the back side of our rse-2d controller. (The
rse-2c's back side is similar, so we don't show it.) Note the
connectors: they're the big black boxy things on either end of the
controller card, and they'll fit into the “flex circuit” header
connectors when you insert the controller.
This is a picture of the back side of our rse-2d controller. (The
rse-2c's back side is similar, so we don't show it.) Note the
connectors: they're the big black boxy things on either end of the
controller card, and they'll fit into the “flex circuit” header
connectors when you insert the controller.
Also note that the connectors are not the same size: one's really
long, the other is not. So it's impossible to insert the controller
“backwards.”
![[Picture of a COMCO RegisterBox]](images/NewRegisterBox.jpg) This is a picture of the “Registration Box” that contains the
Registration Controller. You see it here with the Operator Display and
Keyboard more or less attached to it.
There are cable connectors for
the Photo-Eyes, Motor(s), and Communications on the bottom.
The box also holds the Motor Driver(s).
This is a picture of the “Registration Box” that contains the
Registration Controller. You see it here with the Operator Display and
Keyboard more or less attached to it.
There are cable connectors for
the Photo-Eyes, Motor(s), and Communications on the bottom.
The box also holds the Motor Driver(s).
At Print Stations, you generally find the “Registration Box” mounted on the Gear Side of the Press, with the Operator Display/Keyboard detached and remotely mounted on the Operator side of the Press. That isn't always the case, though. Sometimes the whole “Registration Box” (Display not detached) is mounted on the Operator side of the Press.
At Die Stations, you will normally find the whole “Registration Box” (Display not detached) mounted up underneath the small “control shelf” on the Operator side of the press.
Opening the “Registration Box” to replace the Registration Controller
is easy. You insert an “Electrical Box Key” into the Lock on the back
of the box, and turn a quarter turn. Supporting the door with your left
hand, allow the door to open flat out.
![[Picture of a “folded out” COMCO RegisterBox]](images/OpnRBox.jpg) This is a picture of an open, “folded out” Register Box: it's
disassembled to its major components. The Display/Keyboard is lying
on the other side of the “Registration Box,” and the controller is
lying in the foreground. The Motor Driver is mounted on the door,
attached to the big heatsink.
This is a picture of an open, “folded out” Register Box: it's
disassembled to its major components. The Display/Keyboard is lying
on the other side of the “Registration Box,” and the controller is
lying in the foreground. The Motor Driver is mounted on the door,
attached to the big heatsink.
Please note the Flexible Circuit mounted on the Circular Connectors at
the Bottom of the “Registration Box.” We often call it the “Flex
Circuit,” or just “the Flex” for short. Look closely and you'll see
two black box-like objects on the top of the Flex. These are the
electrical connectors, or “Headers,” that you'll be removing the
Registration Controller from, and re-inserting to.
![[Picture removing Controller from Flex]](images/Rrmvng.jpg) This picture shows Brad removing the Registration Controller from the
Flex. The idea is to use one hand (generally your left) to support the
Flex from rising when you remove the Controller from the Headers,
while using the other to gently lift the Controller from the Headers.
You must lift the Controller straight up; don't twist the Controller
outwards, or you bend the pins in the Headers.
This picture shows Brad removing the Registration Controller from the
Flex. The idea is to use one hand (generally your left) to support the
Flex from rising when you remove the Controller from the Headers,
while using the other to gently lift the Controller from the Headers.
You must lift the Controller straight up; don't twist the Controller
outwards, or you bend the pins in the Headers.
It takes a fair amount of force to get the Controller out of the
Headers, but if you apply this force gradually and gently, the
Controller will come out of the Headers little by little, and that's
what you want. It's allowable and recommended to use a slight rocking
motion to get the controller out of the Headers: alternately lift on
the side of the Controller toward you, and away from you. Try not to
lift one side more than about a 1/16th of an inch higher than the
other.
![[Picture inserting Controller into
Flex]](images/RInsrtng.jpg) This picture shows Brad placing the Controller on the Headers for
re-insertion into the Flex. The connectors on the Controller will fit
neatly into the plastic “box” that surrounds the Header Pins, and you
will feel the Controller sort of “drop” into position. From here you
must insert the Controller straight down, or you'll bend the Header
Pins.
This picture shows Brad placing the Controller on the Headers for
re-insertion into the Flex. The connectors on the Controller will fit
neatly into the plastic “box” that surrounds the Header Pins, and you
will feel the Controller sort of “drop” into position. From here you
must insert the Controller straight down, or you'll bend the Header
Pins.
Grab the four corners of the Controller between your index finger and thumb on each hand. Then gently push the Controller down onto the Header Pins, using a rocking motion like the one you used to remove the Controller. Or use your two index fingers (right and left hand) lined up over the Controller's connectors. However is comfortable for you to do it, the point of the exercise is to _Go Slowly_ And _Deliberately_ until you get the feel of the insertion.
The Controller is fully inserted when you judge by feel that the
connectors on the Controller won't go any deeper into the Headers.
You can also check this by eyeball: there should be something less
than about a 1/16th of an inch of clearance between the Header's
plastic box and the Registration Controller's circuit board.
And that's all there really is to changing out a Registration Controller. What a way to upgrade!
M. L. Riechers Systems Engineering     Voice:  +1-513-844-2220
530 Main Street                        Fax:    +1-513-844-2279
Hamilton, Ohio 45013-3222, USA         mlr(at)rse(dot)com
The Webmaster of this site is free to use the images below on an Apache/NetBSD-powered Web server. Thanks for using Apache on NetBSD!